
Introduction
The oneAPI is a unified programming language developed by Intel. With the help of oneAPI toolkits, you can run the same code on CPU, GPU, FPGA, AI accelerators, etc. without any code changes. The oneAPI toolkits further help in faster performance. The fast performance is achieved through highly optimized low-level libraries such as oneDAL, oneMKL, etc.
There are seven oneAPI toolkits and each toolkit is designed with a different set of users in mind. For example, as you can see, AI Analytics Toolkit is for Data scientists, HPC Toolkit is for HPC developers, and so on.
- Intel® oneAPI Base Toolkit (for most developers)
- Intel® oneAPI HPC Toolkit (for HPC developers)
- Intel® oneAPI AI Analytics Toolkit (for data scientists)
- Intel® Distribution of OpenVINO toolkit (for deep learning)
- Intel® oneAPI Rendering Toolkit (for visual creators, scientists, engineers)
- Intel® oneAPI IoT Toolkit (for edge device and IoT developers)
- Intel® System Bring-up Toolkit (for system engineers)
In this article, we’ll go through the Intel Distribution of OpenVINO toolkit, what is it, how it works, and how to use it with examples. Let’s get started.
What is OpenVINO Toolkit?
Are you trying to speed up vision-related inferencing tasks such as image classification, image captioning, object detection, etc. on your deep learning applications? Then look no further than Intel Distribution of OpenVINO toolkit.
OpenVINO stands for Open Visual Inferencing and Neural Network Optimization. As the name itself says, it is used to optimize neural networks of deep learning models for vision-related tasks.
The OpenVINO toolkit contains tools and libraries that optimize neural networks by applying different techniques such as pruning, quantization, etc. to speed up the inference in a hardware-agnostic way on Intel architectures. So, by using the OpenVINO toolkit you get advantages of faster inference, support for heterogeneous execution on Intel architectures, optimized libraries OpenCV, etc.
How does OpenVINO Toolkit work?
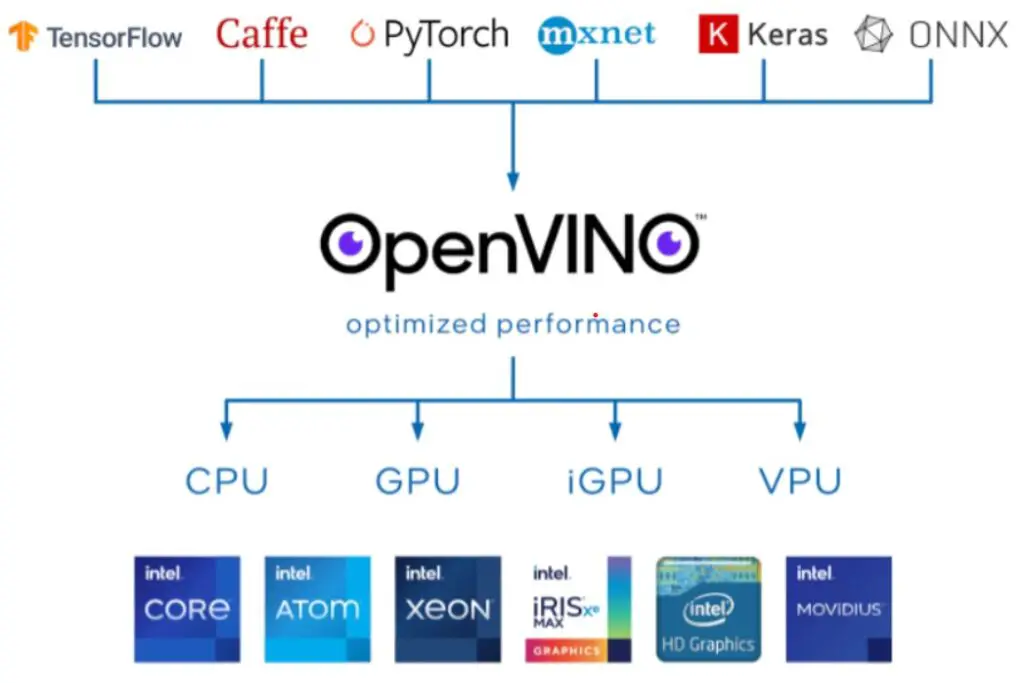
As you can see OpenVINO takes a deep learning model developed using any of the frameworks such as TensorFlow, PyTorch, Mxnet, Keras, ONNX, and Caffe and converts them to one standard format (IR — Intermediate Representation format) that can run on any Intel hardware architecture such as CPU, GPU, Integrated GPU, FPGA, VPU, etc. At the same time, OpenVINO also provides optimized performance for inference.
The Intel® Distribution of OpenVINO™ toolkit contents
The Intel Distribution of OpenVINO toolkit contains –
- Model Optimizer — model optimizer loads any trained deep learning and converts it to IR (Intermediate Representation) format. The IR format is optimized for faster inference.
- Inference Engine —the inference engine reads the IR format and is responsible for running the model on the different hardware architectures such as CPU, GPU, Integrated GPU, etc.
- Model Zoo — The model Zoo for OpenVINO contains pre-trained models (such as VGG16, Alexnet, Yolo, etc) optimized by Intel and also publicly available pre-trained models. These pre-trained models include use cases involving object detection, image classification, image segmentation, etc. The Model Zoo Repository contains many examples that help you get started with OpenVINO quickly.
The basic workflow of Intel® Distribution of OpenVINO™ toolkit
Step 1 — As the first step, the already trained deep learning model is loaded into Model Optimizer which then converts the model into Intermediate Representation. This IR format contains 2 files—
- .xml – describes the network topology.
- .bin – contains the weights and biases in binary format.
Note that the generated IR files can be further optimized for inference using Post-training optimization that applies post-training quantization methods.
Step 2 — Next, in the user application, the Inference Engine loads the IR files and uses them for inference on Intel architecture on cloud or edge, or on-premise.
Installation
Now that we have understood what is OpenVINO and what it does, let’s install the toolkit, and then in the next section, we look at an example.
Before you start with the installation, do check the system requirements.
(1). There are two options to install the OpenVINO Toolkit. Choose the right one based on your requirement.
- OpenVINO Runtime — If you have already completed model development and are ready for deployment then go ahead with OpenVINO Runtime.
- OpenVINO Development Tools — If you need to develop the model, convert it to IR format, and optimize then install OpenVINO Development Tools.
(2). Go to the below link and follow the on-screen instruction to download. https://www.intel.com/content/www/us/en/developer/tools/openvino-toolkit/download.html.
After selecting Environment: Dev Tools, Operating System: Linux, OpenVINO Toolkit Version: 2022.1, Distribution: pip, and Frameworks: TensorFlow 2.x, I was asked to use the command pip install openvino-dev[tensorflow2]==2021.4.2 to install OpenVINO. Follow the similar step as per your OS, Framework, etc, and install the software.
					# Create environment
conda create -n openvino_env python=3.8

# Activate the environment
conda activate openvino_env

# Install OpenVINO
pip install openvino-dev[tensorflow2]==2021.4.2

# Install and Open Jupyter notebook
pip install jupyter
jupyter notebook
To confirm the installation run mo -h from the command prompt and if you get the details about model optimizer commands your installation is successful.
Example
In this section, we’re going to use the pre-trained TensorFlow model inception-resnet-v2-tf for the image classification task using the OpenVINO toolkit. Open the Jupyter Notebook from the virtual environment openvino_env you created in the previous section.
Step 1— Download the model
Execute the below command which will download the pre-trained model inception-resnet-v2-tf to /home/chetan/public folder.
!omz_downloader --name inception-resnet-v2-tf
					################|| Downloading inception-resnet-v2-tf ||################
========== Downloading /home/chetan/public/inception-resnet-v2-tf/inception_resnet_v2_2018_04_27.tgz
... 100%, 220587 KB, 6325 KB/s, 34 seconds passed
========== Unpacking /home/chetan/public/inception-resnet-v2-tf/inception_resnet_v2_2018_04_27.tgz
Step 2— Import the libraries
					import cv2
import matplotlib.pyplot as plt
import numpy as np
from openvino.runtime import Core
from pathlib import Path
from IPython.display import Markdown
Step 3—Convert the model to IR
Step 3a — Set paths of the pre-trained and converted models
					model_path = Path("/home/chetan/public/inception-resnet-v2-tf/inception_resnet_v2.pb")
ir_path = Path(model_path).with_suffix(".xml")
Step 3b — Construct the command to run Model Optimizer
Next, we need to construct the command to run the model optimizer. To get an overview of all the arguments to mo run mo --help. Here is the explanation of the arguments used in the below code —
- input_model: path to pre-trained model or the source model (TensorFlow, PyTorch, Caffe, Mxnet, etc)
- input_shape: The shape that should be fed to the input node of the model.
- mean_values: It is the mean values to be used for the input image per channel and follows [R, G, B] format. Note that the order depends on the model used for training.
- scale_values: All the values are divided by this value.
- data_type: Specifies the data type of the intermediate tensors and weights. For example, if the original model is in FP32 then specifying FP16 will result in model weights and biases compressed to FP16.
- output_dir: The folder where you want to store the converted IR format model.
					mo_command = f"""mo
                 --input_model "{model_path}"
                 --input_shape "[1,299,299,3]"
                 --mean_values="[127.5,127.5,127.5]"
                 --scale_values="[127.5]"
                 --data_type FP16
                 --output_dir "{model_path.parent}"
                 """
mo_command = " ".join(mo_command.split())
print("Model Optimizer command to convert TensorFlow to OpenVINO:")
display(Markdown(f"`{mo_command}`"))
Step 3c — Run Model Optimizer
Once the model optimizer command is constructed in the previous step, run the below command. This will convert the model to IR format. Note that it will take a few minutes.
					print("Exporting TF model to IR. This may take a few minutes.")
! $mo_command
The model optimizer will create 3 files — inception_resnet_v2.xml, inception_resnet_v2.mapping, and inception_resnet_v2.bin.
Step 4 — Load the converted model
In the previous step, we have now converted the model to IR. Next, initialize the inference engine with Core(), then load the IR with read_model() , and finally, compile the model for the specific device using compile_model(). Since we are doing this on CPU, set device_name=’CPU’.
					# Load the converted model
ie = Core()
model = ie.read_model(model="public/inception-resnet-v2-tf/inception_resnet_v2.xml")
compiled_model = ie.compile_model(model=model, device_name="CPU")
We only passed the .xml file to read_model. But the read_model expects the .bin file to be in the same directory.
Step 5 — Get Model Information
We can get the information about the inputs and outputs of the model from model.inputs and model.outputs or compiled_model.inputs and compiled_model.outputs.
					input_key = next(iter(compiled_model.inputs))
output_key = next(iter(compiled_model.outputs))
network_input_shape = input_key.shape
Step 6 — Load an Image
Let’s load a Bengal Tiger image from the internet. The inception_resnet model requires an image in RGB format, so we convert the image from BGR2RGB and resize the image as per the model and finally resize the image.
					# The Inception Resnet network expects images in RGB format
image = cv2.cvtColor(cv2.imread(filename="data/cat.jpeg"), code=cv2.COLOR_BGR2RGB)

# Resize image to network input image shape
resized_image = cv2.resize(src=image, dsize=(299, 299))

# Transpose image to network input shape
input_image = np.expand_dims(resized_image, 0)
plt.imshow(image);

Step 7 — Inference
In the final step, we make an inference by calling compiled_model(). The model outputs result_index as 293 and to get the meaning of this value we need the corresponding label labels.txt which is ‘tiger’.
					# Prediction
result = compiled_model([input_image])[output_key]
result_index = np.argmax(result)

# Convert the inference result to a class name.
imagenet_classes = open("/home/chetan/public/inception-resnet-v2-tf/labels.txt").read().splitlines()
print("Result index:", result_index)
print("Predicted class:", imagenet_classes[result_index])
Output –
					Result index: 293
Predicted class: tiger
You just ran a TensorFlow model through OpenVINO workflow. Hurray! Give yourself a pat on the back !! You deserve it 👏. This is one of the simple examples to introduce you to the OpenVINO toolkit.
There are hundreds of tutorials and demos available on the official documentation to get started with OpenVINO covering a variety of use cases. I strongly suggest you go through as many examples as you can. So that you can comfortably use the OpenVINO toolkit in your next Deep Learning application.
Summary
In this blog, we covered what is OpenVINO toolkit, how it works, what the toolkit contains, and finally went through an image classification example using a pre-trained model. Hope that you find the article useful.
Note that the OpenVINO toolkit contains a lot of tools and libraries. I barely scratched the surface in this article🙂. There is so much to learn about such as Model Zoo, OpenVINO Deep Learning Workbench, Post-Optimization Quantization (POT), Add-ons (OpenVINO Model Server, OpenVINO Security, etc.), Media Processing & Computer Vision Libraries (OpenCV, OpenCL), etc. For those curious minds, I suggest you explore more about OpenVINO.
#oneAPI
Originally published on Medium on 12-Apr-2022.
