Introduction
Weather data includes meteorological parameters such as temperature, precipitation, snow, wind direction, wind speed, wind gust, pressure, etc. Weather and climate data play an important role in our daily life. The historical data is used to forecast the weather which helps many industries such as agriculture, aviation, energy, etc. For example, predicting the weather data as accurately as possible can help farmers to plan their crops. Similarly, in the aviation industry weather plays an important role.
Data Scientists use Machine learning and Statistical Forecasting methods to predict weather conditions based on historical data. In this article, we will understand how to use the Meteostat package to get historical weather and climate data.
You can access the complete code for this article from GitHub here.
Meteostat
If you are looking for weather data such as temperature, pressure, precipitation, wind speed, wind direction, etc. for your project or product or application then look no further than Meteostat. Meteosat is an open platform that provides free access to historical weather and climate data.
It provides 4 different interfaces to get weather and climate data as mentioned below:-
- Meteostat Web App: Provides access to weather and climate data of any place through a simple UI.
- Meteostat Bulk: Provides an option to download Meteostat data in bulk.
- Meteostat API: Provides JSON API to get weather data by weather station or geo-location.
- Meteostat Python: Provides a Python library called meteostat to access historical weather and climate data.
This article aims to use the Python library meteostat to get historical weather and climate data so we will not be discussing the other three methods. So, let’s get started.
If you are interested in knowing the data sources for Meteosat then refer here.
Installation
You can install the Python package with the simple command as shown. Meteostat support only Python ≥ 3.6. So, make sure you using Python ≥ 3.6
pip install meteostat
Usage
Meteostat provides a very simple and intuitive interface to get historical weather and climate data. Let’s say you want to get the historical data for Bangalore.
Firstly, decide the duration you want to get the historical data. Once you decide the duration, you need to create the start date and end date as datetime objects as shown below.
					# Set time period
start = datetime(2021, 1, 1)
end = datetime(2022, 9, 30)
Next, you need to create a Point object by passing the latitude and longitude of the location (and optionally altitude) as you can see below –
					# Create Point for Bangalore, KARNATAKA
place = Point(12.971599, 77.594566)
Finally, run the below code to get the hourly historical data. The output is Pandas dataframe. Since the output is pandas dataframe it is very easy to export to CSV, Excel, or load it into the database for your further analysis.
					# Get hourly data
data = Hourly(place, start, end)
data = data.fetch()
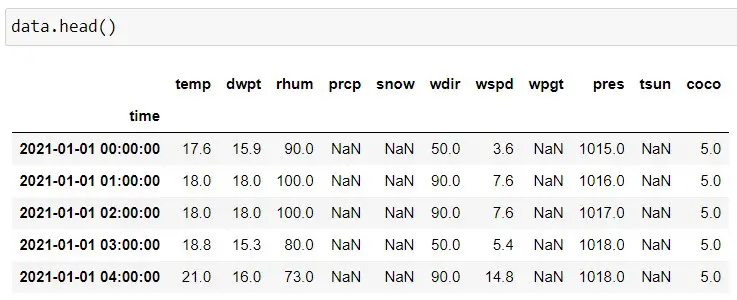
If you are looking for Daily historical data then use the below code —
					# Get daily data
data = Daily(place, start, end)
data = data.fetch()

# Show dataframe
data.head()
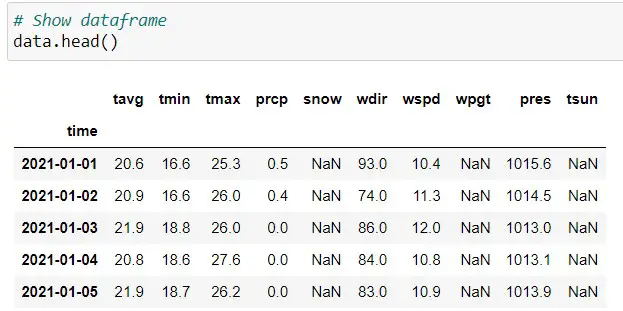
If you are looking for Monthly historical data then use the below code —
					# Get Monthly data
data = Monthly(place, start, end)
data = data.fetch()

# Show dataframe
data.head()
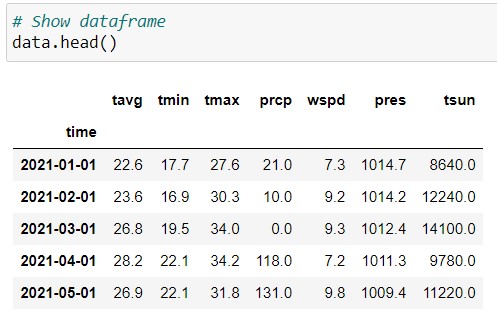
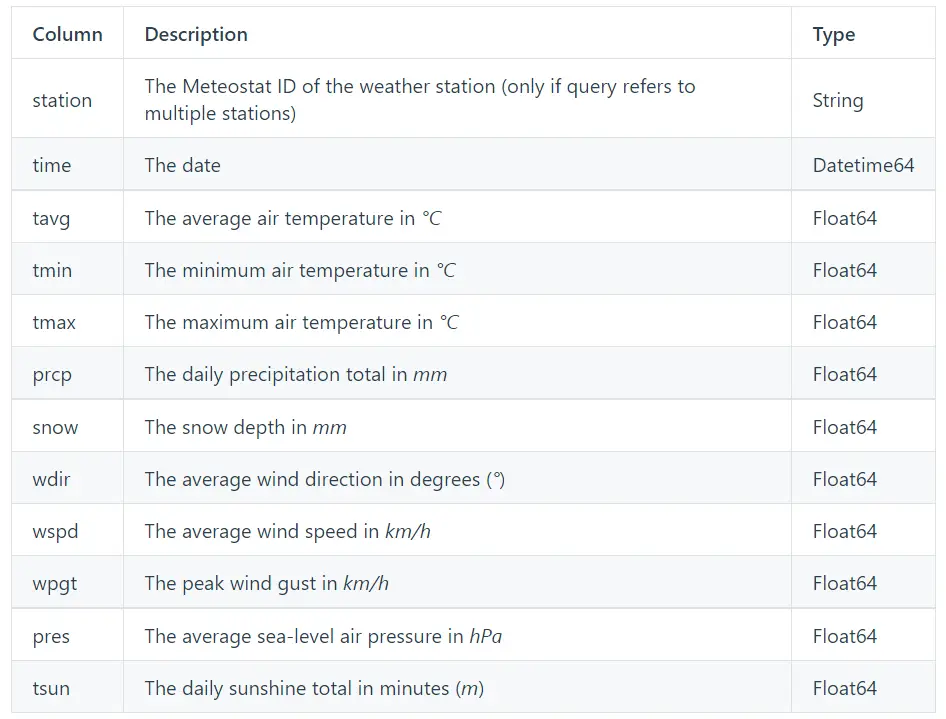
Refer to the below table for the explanation for each column.
Example
It was a very simple process to get the historical data using meteostat. Isn’t it? Now, let’s apply the knowledge to a simple use case. In this section, we will build a forecasting model using FB Prophet to predict the temperature in Bangalore based on the historical data collected from meteostat. Let’s fire up the notebook and get started.
Import libraries
					from datetime import datetime
from meteostat import Point
from meteostat import Hourly
from meteostat import Daily
from meteostat import Monthly
import pandas as pd

from prophet import Prophet
import matplotlib.pyplot as plt
import warnings
warnings.filterwarnings('ignore')
from sklearn.metrics import mean_absolute_error
Pull historical data for Bangalore. Note the results are stored in data as pandas dataframe.
					# Set time period
start = datetime(2021, 1, 1)
end = datetime(2022, 9, 30)

# Create Point for Bangalore, KARNATAKA
place = Point(12.971599, 77.594566)
data = Daily(place, start, end)
data = data.fetch()
Train test split. Data for the month of Sep-2022 will be used for validation. And renamed the columns as required for the Prophet library.
					train = data.loc[:'2022-08-31']
test = data.loc['2022-09-01':]

train = data[['tavg']]
train = train.reset_index()
train.columns = ['ds', 'y']
Train prophet model and predict on the test
					model = Prophet()
model.fit(train)
future = pd.DataFrame(test.index.values)
future.columns = ['ds']
forecast = m.predict(future)
Evaluate the model
					# calculate MAE between expected and predicted values
y_true = test['tavg'].values
y_pred = forecast['yhat'].values
rmse = math.sqrt(mean_squared_error(y_true, y_pred))
print('RMSE:', rmse)
Plot actual and predicted values
					# plot expected vs actual
plt.plot(y_true, label='Actual')
plt.plot(y_pred, label='Predicted')
plt.ylim(ymax=30, ymin=15)
plt.legend()
plt.show()
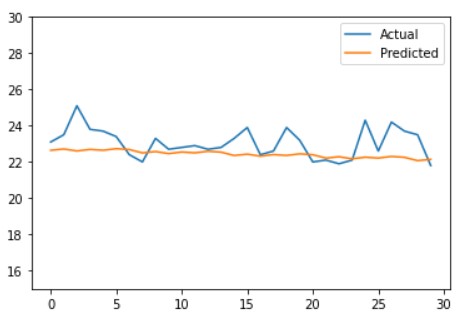
Note that the forecasting model we created here is a very simple model. The model can be further improved based on domain knowledge and trying different models such as ARIMA, SARIMA, SARIMAX, etc.

