

Introduction
A typical machine learning workflow consists of several steps from data gathering to model deployment. The real-world data is so messy that you almost always don’t use the data as-is. You need to apply a lot of transformations such as imputing missing values, scaling, feature selection, normalization, encoding categorical, etc.
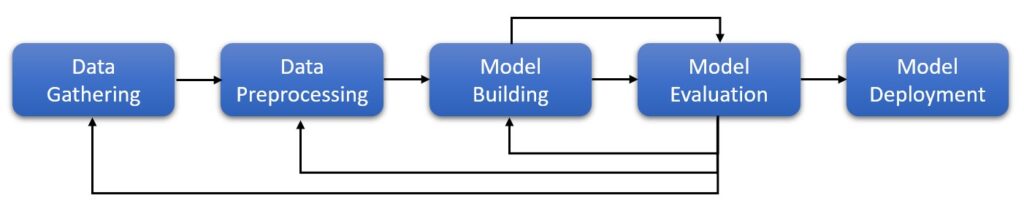
You would apply these transformations at least two times —once when training the model and when predicting on the test set. Note that if you happen to put your model into production, the same transformations are applied each time model is called for prediction. Certainly, you don’t want to duplicate the code for train and test. You could write function(s) for these transformations and call them as needed. But this method is not efficient, not readable and is error-prone.
The Scikit-learn package provides a Pipeline object that you can use to automate your machine learning pipeline. In this article, we are going to learn what is Scikit-learn pipeline, the transformers, how to create pipelines, etc.
What is a Scikit-learn Pipeline and how does it work?
Scikit-learn Pipeline consists of several steps that are executed sequentially i.e. the output of one step is passed to the next step and so on. All the intermediate steps except the last are called transformers and the last step is called an estimator.
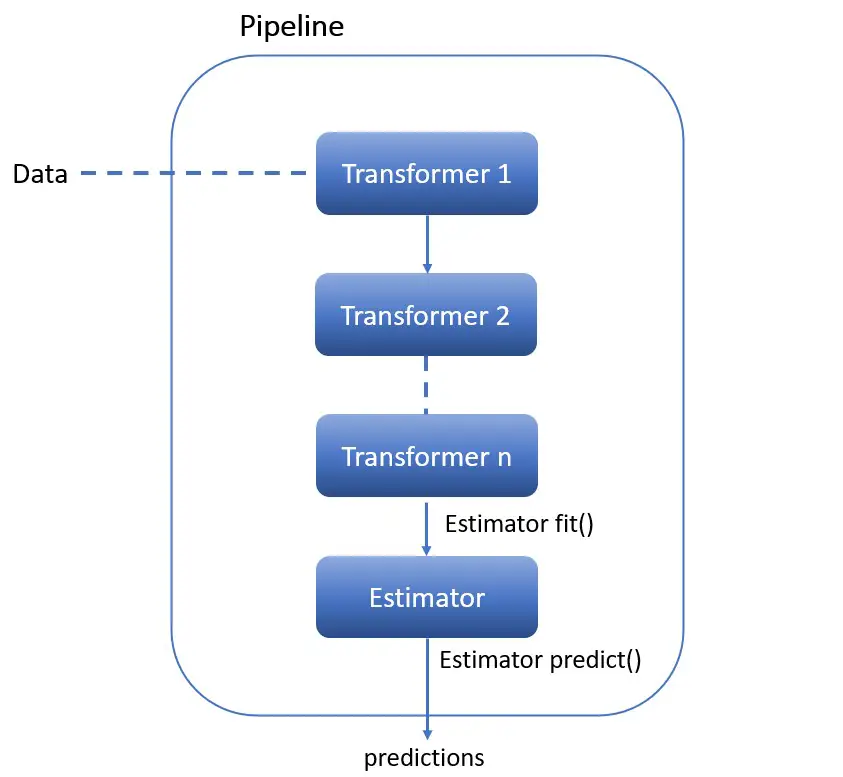
So, what are the transformers and estimators? — Transformers are the objects that implement fit() and transform() methods. And estimators are the object that implements fit() and predict() methods.
In layman’s terms, as the name itself says, transformers apply transformations to the data. And estimators, as you would have guessed, are nothing but ML models.
Why do we use Scikit-learn Pipeline?
- With Pipelines, your code is easier to read and understand. Hence less error-prone.
- You don’t have to call fit() and transform() methods for every transformers you write. You only have to call fit() and transform() once on the final Pipeline object.
- Pipelines help avoid leaking the test data into the trained model during cross-validation (Refer to this article to see how it helps)
How to use Scikit-learn Pipeline?
We have understood what is Pipeline, the importance of the Scikit-learn Pipeline, and how it works. It’s time to learn how to create Pipelines. In this section, you will learn different methods available in Scikit-learn that help us in building the Pipelines.
First, import all the required libraries we are going to use throughout this blog.
					import numpy as np
import pandas as pd
from sklearn import set_config
set_config(display="diagram")

from sklearn.pipeline import make_pipeline, make_union
from sklearn.pipeline import Pipeline, FeatureUnion
from sklearn.impute import SimpleImputer
from sklearn.compose import ColumnTransformer, make_column_transformer, make_column_selector
from sklearn.preprocessing import OneHotEncoder, StandardScaler
from sklearn.feature_extraction.text import TfidfVectorizer
from sklearn.preprocessing import FunctionTransformer
from sklearn.linear_model import SGDClassifier
from sklearn.metrics import accuracy_score
from sklearn.model_selection import train_test_split
from sklearn.svm import SVC
Pipeline
This is the main method used to create Pipelines using Scikit-learn. The syntax for Pipeline is as shown below —
sklearn.pipeline.Pipeline(steps, *, memory=None, verbose=False)
- steps — it is an important parameter to the Pipeline object. You need to pass a sequence of transforms as a list of tuples. Each tuple is represented in the form
(step_name, transformer object). For example, to apply the standard scaling and the SVC model, you could write the steps as('scaler', StandardScaler())and('svc', SVC())respectively.
Example —
In the below example, we want to run the scaler and estimator steps sequentially. First, we create a Pipeline object called pipe with the steps. Next, when you can pipe.fit(), scaler, and estimator steps are executed one after the other. Similarly, when you can pipe.predict() method, it will apply the same steps again and then make predictions using the estimator.
					from sklearn.datasets import load_wine
data = load_wine()

df = pd.DataFrame(data=data.data, columns=data.feature_names)
df['target'] = data.target
df.head()

X = df.drop(['target'], axis=1)
y = df['target']

X_train, X_test, y_train, y_test = train_test_split(X, y, random_state=42, stratify=y)

pipe = Pipeline(steps=[
    ('scaler', StandardScaler()),
    ('svc', SVC())
])

pipe.fit(X_train, y_train)
y_pred = pipe.predict(X_test)
accuracy_score(y_pred, y_test)
# Output: 0.9777777777777777
This is a very simple example of a Pipeline. Typically, production-grade Scikit-learn Pipelines make use of ColumnTransformer, FeatureUnion, etc. We will cover them shortly. Keep reading.
make_pipeline
As mentioned in the official documentation, make_pipeline is the shorthand notation for Pipeline. It does not require and does not permit, naming the estimators/steps. Instead, their names will be set automatically.
Since make_pipeline is a shorthand notation for Pipeline, the syntax is the same as the Pipeline —
sklearn.pipeline.make_pipeline(*steps, memory=None, verbose=False)
The example you saw in the Pipeline section above can be written using make_pipeline as below. The only difference is that the make_pipeline() method is less verbose but otherwise it works exactly the same as Pipeline. As you can see from the output below there is no difference in the output using Pipeline or make_pipeline.
					pipe = make_pipeline(StandardScaler(),
                     SVC())

pipe.fit(X_train, y_train)
y_pred = pipe.predict(X_test)
accuracy_score(y_pred, y_test)
# Output: 0.9777777777777777
FeatureUnion
FutureUnion takes several transformer objects and each of these transformers is executed in parallel. The output from these transformers is combined and passed to the last step i.e. estimator. FeatureUnion is useful when you want to apply different transformations to the same data.
sklearn.pipeline.FeatureUnion(transformer_list, *, n_jobs=None, transformer_weights=None, verbose=False)
- transformer_list — This is the main parameter to FeatureUnion. It expects a list of tuples in the form (“name”, transformer) similar to the Pipeline object.
Let’s say you are working on text data and want to apply TF-IDF and also get the length of the text to build the model. FeatureUnion is the best suited for this scenario because we need to apply different transformations to the same data.
Example —
The below example makes use of two transformers namely tf-idf and length. Both transformers are passed to FeatureUnion to create a preprocessor object. Then, a pipeline is created using a preprocessor and estimator. When you call pipe.fit(), the preprocessor object executes both the transformers in parallel, and the output of both the transformers is combined and passed to the estimator. The same happens when you can pipe.predict().
					df = pd.read_csv('SPAM text message 20170820 - Data.csv')

X = df['Message']
y = df['Category']

X_train, X_test, y_train, y_test = train_test_split(X, y, random_state=0, stratify=y)

def get_text_length(x):
    return np.array([len(t) for t in x]).reshape(-1, 1)

preprocessor = FeatureUnion([
    ('tf-idf', TfidfVectorizer()),
    ('length', FunctionTransformer(get_text_length, validate=False))
])

pipe = make_pipeline(preprocessor,
                     SGDClassifier())

pipe.fit(X_train, y_train)
y_pred = pipe.predict(X_test)
accuracy_score(y_test, y_pred)
# Output:0.8657573582196698
In this example, you applied different transformations to the same data. But, how do you apply different transformations on different features parallelly? This is achieved using ColumnTransformer.
make_union
make_union is the shorthand notation for FeatureUnion. It does not require and does not permit, naming the estimators/steps. Instead, their names will be set automatically.
Since make_union is a shorthand notation for FeatureUnion, the syntax is the same as the FeatureUnion—
sklearn.pipeline.make_union(*transformers, n_jobs=None, verbose=False)
- transformers —It is the main parameter to make_union. It expects one or more transformers. The transformers are executed in parallel on the same data.
You can rewrite the FeatureUnion example you saw in the previous example using make_union as below. Similar to make_pipeline, make_union is less verbose but works the same as FeatureUnion. As you can see from the output below there is no difference in the output using FeatureUnion or make_union.
					preprocessor = make_union(TfidfVectorizer(),
                          FunctionTransformer(get_text_length, validate=False))

pipe = make_pipeline(preprocessor,
                     SGDClassifier(random_state=42))

pipe.fit(X_train, y_train)
y_pred = pipe.predict(X_test)
accuracy_score(y_test, y_pred)
# Output: 0.8657573582196698
ColumnTransformer
So far, you saw how to create a simple Pipeline and how to apply different transformations to the same data. But the real-world data requires different transformations on a different set of columns. How do you go about it? The ColumnTransformer helps in performing different transformations on different columns parallelly.
sklearn.compose.ColumnTransformer(transformers, *, remainder='drop', sparse_threshold=0.3, n_jobs=None, transformer_weights=None, verbose=False, verbose_feature_names_out=True)[source]
- transformers —it expects a list of tuples in the form (name, transformer, columns).
- remainder — by default (remainder=’drop’), only the columns specified in ColumnTransformer are used for transformation. The rest of the columns are dropped. If set to ‘passthrough’, the columns that are not specified in the ColumnTransformer are passed through the next step as-is.
- verbose_feature_names_out — If True, get_feature_names_out will prefix all feature names with the name of the transformer that generated that feature. If False, get_feature_names_out will not prefix any feature names and will error if feature names are not unique.
Example —
We’ll use the Titanic dataset for this demonstration and we consider the only the following features —
numeric — ['SibSp', 'Parch', 'Fare']
categorical — ['Pclass', 'Sex', 'Embarked']
As you see, the data has both numerical and categorical features. We need to handle both differently. You would like to apply OneHotEncoder transformation to categorical data and StandardScaler to numerical features. Since you are going to apply different transformations on different features, ColumnTransformer is best suited for this scenario.
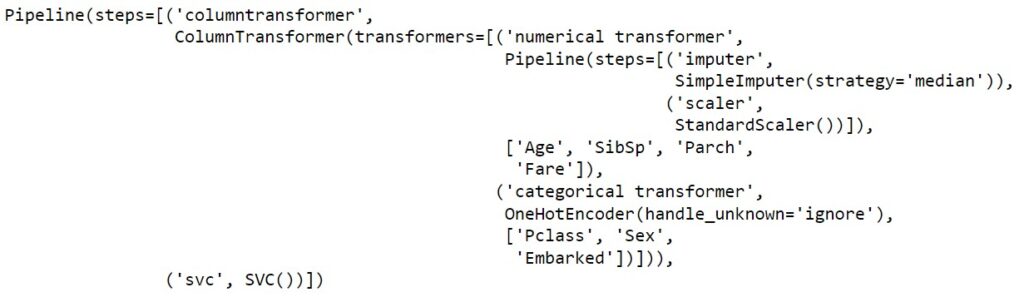
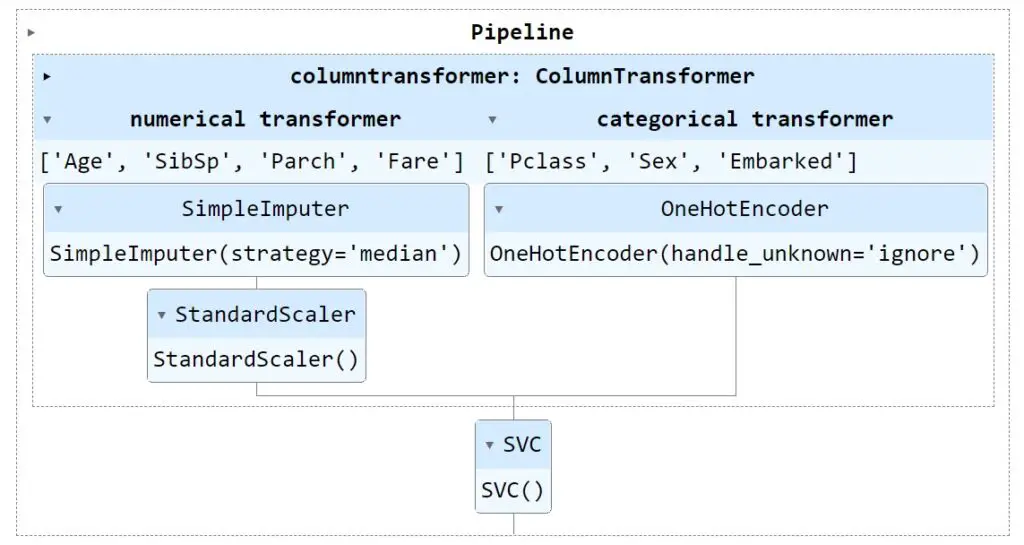
But, ColumnTransformer expects a list of transformers, So, let’s create two transformers numeric_transformer and categorical_transformer. The numeric_transformer is used for scaling the numerical features and the categorical_transformer is used for one-hot encoding the categorical features. Then preprocessor object is created using ColumnTransformer and finally the Pipeline object.
When you can pipe.fit(), ColumnTransformer runs both the transformers parallelly. The output is combined and passed to the next step i.e. estimator. The same transformers are executed when you can pipe.predict().
					df = pd.read_csv('titanic_train.csv')

X = df.drop('Survived', axis=1)
y = df['Survived']

X_train, X_test, y_train, y_test = train_test_split(X, y, test_size=0.2, random_state=0, stratify=y)

num_features = ['Age', 'SibSp', 'Parch', 'Fare']
numeric_transformer = Pipeline(
    steps=[("imputer", SimpleImputer(strategy="median")),
           ("scaler", StandardScaler())]
)

cat_features = ['Pclass', 'Sex', 'Embarked']
categorical_transformer = OneHotEncoder(handle_unknown="ignore")

preprocessor = ColumnTransformer(
    transformers=[("numerical transformer", numeric_transformer, num_features),
                  ("categorical transformer", categorical_transformer, cat_features)],
    remainder='drop'
)

pipe = make_pipeline(preprocessor,
                     SVC())

pipe.fit(X_train, y_train)
y_pred = pipe.predict(X_test)
accuracy_score(y_pred, y_test)
# Output: 0.8100558659217877
Note: Even though X_train & X_test contain other features such as PassengerId, Name, Ticket, and Cabin, they are ignored during the transformation as we have set remainder=’drop’. This is as expected as we didn’t want to process these features. In case, if you want to apply some transformation on these columns, you can create additional transformers.
make_column_transformer
This is a shorthand for the ColumnTransformer; it does not require and does not permit, naming the transformers. Instead, they will be given names automatically. The syntax is the same as ColumnTransformer —
sklearn.compose.make_column_transformer(*transformers, remainder='drop', sparse_threshold=0.3, n_jobs=None, verbose=False, verbose_feature_names_out=True)
The pipeline we have written using ColumnTransformer can be represented using make_column_transformer as below. The only difference is you are not passing the name of the transformer.
					preprocessor = make_column_transformer(
    (numeric_transformer, num_features),
    (categorical_transformer, cat_features)
)

pipe = make_pipeline(preprocessor,
                     SVC())

pipe.fit(X_train, y_train)
y_pred = pipe.predict(X_test)
accuracy_score(y_pred, y_test)
# Output: 0.8100558659217877
make_column_selector
This is generally used with ColumnTransformer to select the columns using a regex pattern, or based on the data type. The syntax –
sklearn.compose.make_column_selector(pattern=None, *, dtype_include=None, dtype_exclude=None)
If you want to apply numeric_transformer on all the numeric columns in the data and categorical_transformer on all category columns then you can use the below code. make_column_selector(dtype_include=np.number) select all the numeric columns and make_column_selector(dtype_include=object) select all the categorical columns.
					preprocessor = make_column_transformer(
    (numeric_transformer, make_column_selector(dtype_include=np.number)),
    (categorical_transformer, make_column_selector(dtype_include="object"))
)

pipe = make_pipeline(preprocessor,
                     SVC())

pipe.fit(X_train, y_train)
y_pred = pipe.predict(X_test)
accuracy_score(y_pred, y_test)
# Output: 0.8100558659217877
Displaying pipelines
By default, the pipeline object is shown as text. If you would like to visualize the Pipeline, you need to set display="diagram" as shown below.
					from sklearn import set_config
set_config(display="diagram")
Code
Please refer to the below Gist for the complete code for this article.
Note that the below code doesn’t show Scikit-learn Pipeline as a diagram. You will have to run the code locally.
Summary
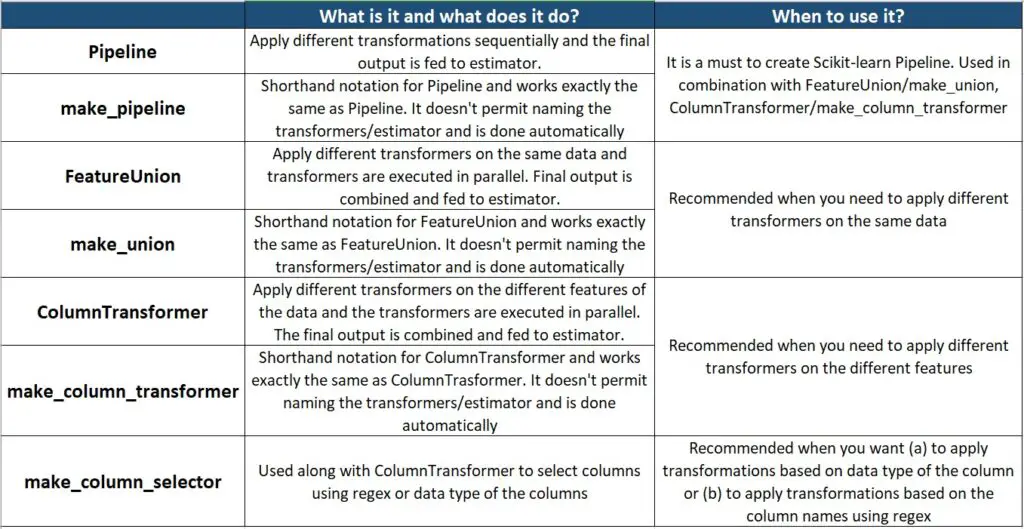
In this detailed article, we covered what are Pipelines, why should we use Scikit-learn Pipelines, and how to create Scikit-learn Pipelines using the different methods available in Scikit-learn with syntax and examples. The below tables summarises. Finally, we learned how to display Pipelines as images for a better understanding of the Pipeline.
There is still a lot to learn about Pipelines. In the future article about Pipelines, I will introduce you to different built-in transformers from Scikit-learn, how to create custom transformers, how to use K-fold cross-validation & GridSearch CV with Pipeline, and how to access the output of individual transformers, etc. Stay tuned !!
